
See the benefits MySQL replication can bring to your environment.
My first Linux-based project at work was a Web-based LAMP (Linux/Apache/MySQL/Perl) stack that provided engineering reports and analysis for my department. Over time, that evolved into Tomcat/MySQL/Java (which doesn't acronym nicely at all) and moved past my department to the whole facility, and eventually to several different manufacturing locations. As my user count increased, so grew the expectation of 24x7 uptime, and I needed to get serious about redundancy for my single database instance.
MySQL's built-in replication option seemed like a logical choice, as it seemed easy to configure and would provide an additional level of redundancy. I was pleasantly surprised at how easy it was to enable replication, and after two years of use in production, my only regret is that I didn't implement it sooner.
This article is written based on the 5.5 version of MySQL, but it also will work for 5.6. Although 5.6 reached “generally available” status in February 2013, there are still a lot of 5.5 installations out there in production.
MySQL's replication is a way for one or more slave servers to stay in sync with a single master server. At a high level, this is accomplished by having the master log all database changes to a local file. Each slave knows its master log filename and position within that file, and routinely queries the master for any new changes. As changes are found, the slave modifies its copy of the database and moves its master log file pointer accordingly. This means the slaves will process changes in the same order as executed on the master, although each slave may be at a slightly different position in the change log.
Replication is quite different from clustering. Replication can be enabled in the standard MySQL server installation (“MySQL Community Edition”) by enabling a few control file options, but clustering requires installing an entirely different product (“MySQL Cluster”). In clustering, a set of machines synchronize reads and writes across all the machines in the cluster—all machines in the cluster are essentially identical. In replication, all writes occur solely on the master. Reads can be performed on any machine, with the understanding that a slave may be slightly behind the master. In my experience, slave machine delays are typically less than a second.
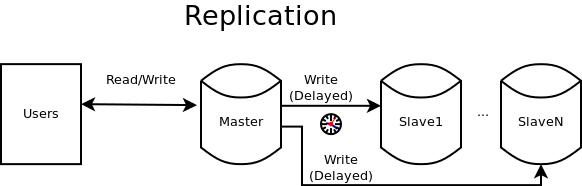
Figure 1. Example Replication Flow
Impact-Free Database Backups:
Replication alone is not a backup strategy. From personal experience, I can assure you that silly SQL mistakes on the master will propagate to your slaves faster than you ever thought possible, but replication can ensure that the process of making backups won't affect your master server. Creating a quality database backup is a resource-intensive operation, and it usually requires a write lock for the duration of the backup in order to ensure consistency. Prior to configuring replication on our system, our production server would use MySQL's mysqldump tool to create backups at 6am and 6pm. This worked well at first, but as users requested more types of data and longer retention windows, the amount of backup time passed the point where users would accept write interruption. The increased I/O load during backups also would degrade normal application performance, further annoying our users.
After introducing clustering, the entire backup process can be moved onto one of the slaves. The slave can be write-locked for the whole backup process with no write or I/O impact to the master. Once the slave is finished creating the backup, it releases the write lock and quickly catches back up to the master.
Batch Reporting and Load Balancing:
With the rising popularity of data-mining techniques, it's entirely possible that you may want to start using your operational, near real-time database to do some hefty batch reporting. Though these types of reports typically don't require write locks during processing, enough of them can degrade performance while they're crunching data. Prior to implementing replication, we manually scheduled batch jobs to run at traditionally low usage time slots, but this was error-prone and became significantly more complex as we started supporting users from other time zones.
After implementing replication, we have offloaded all of these batch reports to a data-mining server with its own MySQL slave instance. Batch reports and data mining now can be scheduled at the user's convenience, not just when the server is idle.
Direct End-User Access:
One of the downsides of making a really awesome database is that eventually other folks will want to get their fingers into that database too. Each additional user increases the base system load and the risk that their queries may misbehave. You could develop a bunch of Web services and insist that they use those instead of directly querying the database, but that is a lot of extra work, even more maintenance and slows down innovation. On the other hand, giving even the most experienced users direct access could lead to SQL mistakes that stress the database. MySQL has a nice facility for limiting user queries with resource limits, but even that doesn't guarantee zero impacts to your coveted production database.
After replication, you can offload this read-only traffic to one of your slaves. It's even possible to let the end users create their own MySQL with very little input required on your end.
Hot Failover Capability:
Once you have replication configured, you can start to leverage the hot failover capabilities built in to MySQL's Connector/J JDBC driver. With a properly structured URL, the JDBC infrastructure automatically can sense that the master database is down and failover to the slave in read-only mode. Once the master database comes back up, connections automatically will start using the master again—no application outage required. For applications where the bulk of operations are reads, this can be a real lifesaver! Enabling this failover option is incredibly simple, as shown in the following JDBC URL example: jdbc:mysql://master.mydomain.org,slave1.mydomain.org:3306/MYDATABASE.
Although the default options probably are sufficient for most cases, there are plenty of more advanced options for fine-tuning. See the Connector/J documentation for more information.
Hopefully, you're sold on the benefits that replication can provide and are ready to start.
Replication Types:
The first important configuration decision is choosing between the three main replication strategies offered by MySQL: statement-based (SBR), row-based (RBR) or mixed-based replication (MBR). In MySQL 5.5, SBR is the default.
At a high level, you can think of statement-based replication as simply copying any SQL statements that modify content on the master (insert, update, delete and so on) to a log file. For example, if the master sees DELETE FROM ME.FOO WHERE BAR=1, it puts that SQL in the replication command logs. This logging style has been in use the longest and usually will result in smaller log files than RBR. It is possible, however, to write non-deterministic SQL that will cause RBR to fail. Some obvious examples would be updating a field to a random number (UPDATE ME.FOO SET BAR=RAND();) or deleting the first X rows of a table with no order specified.
Row-based logging takes a very different approach. Instead of logging the raw SQL, the master instead will log changes to specific rows. For example, an UPDATE ME.FOO SET BAR=1 WHERE BAR>5; on the master actually would be logged as many different unique row-level change events (imagine commands like: set BAR=1 where ROW_ID=4, set BAR=1 where ROW_ID=14 and so on). This technique protects you from ambiguous SQL like the RAND() and unordered delete examples above but at the cost of larger log files.
In mixed-based mode, the server will switch between statement or row-based logging based on the type of statement. For example, DELETE FROM FOO is best done as an SBR type command, while row-level updates or non-deterministic statements would be more efficient as RBRs.
This article has more of the gory details: dev.mysql.com/doc/refman/5.5/en/replication-sbr-rbr.html (and some additional pros and cons). I chose SBR because it's easier to understand; I didn't have any of the weird conditions where SBR doesn't work well, and the smaller log size was appealing.
Master Configuration:
If you're setting up MySQL from scratch, install the rpm or debs as usual. (Be sure to run mysql_secure_installation to make your installation a bit more secure. While writing this article, I used the Employees test database and creation script from this url: https://launchpad.net/test-db. The employees-db-full file has both the data and the database creation scripts. Don't forget to uncomment the bind-address line to make the database server listen to more than just localhost.)
Adding replication to the master is pretty basic: the only required entries are the server-id (a unique, nonzero integer—1 is a good choice) and the binary log name pattern. I've included two lines to help auto-expire old replication logs and two additional lines suggested for the InnoDB table type.
Here's an example of configuring the master's [mysqld] section of my.cnf:
[mysqld]
...
#Assign a unique server-id non-zero integer to each machine.
server-id=1
log-bin=mysql-bin.log		#Enables the log
#Log size/time limits
expire_logs_days = 14
max_binlog_size = 100M
#These next 2 lines are recommended for InnoDB tables
#(now the default)
innodb_flush_log_at_trx_commit=1
sync_binlog=1
It's probably a good idea to have replication use a dedicated ID and password, so create an ID and give it “REPLICATION SLAVE” authority:
you@master:~$ mysql -u $SQLID -p
mysql> CREATE USER 'replid'@'%.mydomain.org' IDENTIFIED BY 'replpw';
mysql> GRANT REPLICATION SLAVE ON *.* TO 'replid'@'%.mydomain.org';
mysql> FLUSH PRIVILEGES;
That's it! Once configured, restart the master, and you should start to see mysql-bin.### files being created as changes are made to the tables.
Creating a Master Snapshot:
If you have existing data on the master (a likely situation), you'll need to make a one-time snapshot for a known master log file and log file position, so that the slaves will have a precise point from which to start.
Warning: this will lock all writes while mysqldump is creating the backup, so perform this step during an acceptable maintenance window!
Step 1: open up a MySQL client connection to the master, write-lock the database, and get the master log position. Leave this client connection open until the backup is complete:
mysql> FLUSH TABLES WITH READ LOCK;
mysql> SHOW MASTER STATUS;
+------------------+----------+--------------+------------------+
| File             | Position | Binlog_Do_DB | Binlog_Ignore_DB |
+------------------+----------+--------------+------------------+
| mysql-bin.000274 | 43891079 |              |                  |
+------------------+----------+--------------+------------------+
Note both the file and position somewhere safe, and leave this client connection open until the database dump is complete.
Step 2: from a different terminal on the master, use mysqldump to create a database backup:
you@master~:$ time mysqldump -u $SQLID -p --events
 ↪--all-databases --master-data > masterdump.sql
The --master-data option automatically records the master log file and position from the master and will set these values on the slave when imported. If you create a snapshot without this option, you'll need to record the master filename and position via SHOW MASTER STATUS in the MySQL client connection from step 1. The --events flag is needed to suppress a relatively new warning in MySQL 5.5.30 and up.
Step 3: once the database backup is complete, exit the MySQL client connection from step 1 to release the read lock.
Slave Configuration:
Perform a normal MySQL installation on the slave machine, but add the following to the mysqld section of my.cnf:
[mysqld]
...
server-id=2 #Use a UNIQUE ID for each slave. Don't repeat server-ids
Restart the MySQL server on the slave, then open a MySQL client connection to the slave and set the master hostname, user ID and password:
you@slave1:~$ mysql -u $SQLID -p
mysql> CHANGE MASTER TO MASTER_HOST='master.mydomain.org';
mysql> CHANGE MASTER TO MASTER_USER='replid';
mysql> CHANGE MASTER TO MASTER_PASSWORD='replpw';
Importing the Master Snapshot:
If you have data to import from the master, you either can copy the SQL dump to the slave and import it there:
you@slave1:~$ mysql --user=$SQLID -p < masterdump.sql
Or, if your user ID has remote access, you could load it over the network, saving a file copy step:
you@master~$ mysql --user=$SQLID -p -h slave1 < masterdump.sql
This will take a while. If you haven't used mysqldump before, importing a backup into a new database takes significantly longer than creating the backup in the first place. For my database, creating a backup takes around ten minutes, while creating a new database from that same backup takes about 75 minutes.
Starting Replication:
Once the master and each slave are configured, and you've imported any existing data, open a MySQL client connection to each slave and start replication:
mysql> START SLAVE;
mysql> SHOW SLAVE STATUS \G
*************************** 1. row ***************************
               Slave_IO_State: Waiting for master to send event
                  Master_Host: master.mydomain.org
                  Master_User: replid
                  Master_Port: 3306
                Connect_Retry: 60
              Master_Log_File: mysql-bin.000274
          Read_Master_Log_Pos: 44915942
               Relay_Log_File: slavename-relay-bin.000263
                Relay_Log_Pos: 44916088
        Relay_Master_Log_File: mysql-bin.000274
             Slave_IO_Running: Yes
            Slave_SQL_Running: Yes
...snip...
        Seconds_Behind_Master: 0
...snip...
             Master_Server_Id: 1
1 row in set (0.00 sec)
If Master_log_file or Read_Master_Log_Pos is not specified, you may have forgotten the --master-data option to mysqldump. The Read_Master_Log_Pos should match or be larger than the position you recorded when creating the initial dump.
The most important lines above are:
Slave_IO_Running: Yes
Slave_SQL_Running: Yes
Seconds_Behind_Master: 0
If either Slave_IO or Slave_SQL are No, something went wrong with replication. Check the MySQL logs. Seconds_Behind_Master can fluctuate, but in my experience, it's almost always zero once you reach steady state.
Temporary tables: temporary tables created using the TEMPORARY keyword are excluded from replication automatically. If your application has pseudo-temporary tables that you don't want replicated, you'll have to use a configuration option to exclude them by a table name pattern. As an example, my application has many large user datasets that are just inputs to data-mining queries. Although they need to stay around longer than the length of just one session, they don't need to be present in any backups or even for hot failover. To exclude tables like TMPTBL_1, TMPTBL_FOO from replication, update the master's my.cnf file with the following option: replicate-wild-ignore-table=MYSCHEMA.TMPTBL%.
Don't modify the slaves: if you alter the slave tables in a way that would make a subsequent SQL command on the master fail on the slave, replication will stop. For example, if the master gets the SQL statement DROP TABLE MYSCHEMA.FOO and table FOO doesn't exist on the slave, replication will fail. In my two years of using replication, this type of self-inflicted error has been the only thing I've seen that breaks replication.
Monitoring the slaves: write a script to monitor the response of SHOW SLAVE STATUS on each of your slaves, checking to make sure Slave_IO_Running and Slave_SQL_Running are both Yes and that Seconds_Behind_Master is something you're comfortable with.
Monitoring the master: Connector/J's hot failover capability is a great feature. Don't forget to disable that for any monitoring scripts though. At my first planned outage, all my database health-monitoring scripts happily failed over to the slave machine!
Although this article was written using MySQL 5.5, version 5.6.10 reached generally available (GA) status in February 2013. Version 5.6 brings some interesting new choices, including Delayed Replication: a slave can now be told to stay a deliberate amount of time behind the master. This could be interesting and provide a chance to recover quickly from an accidental delete or update. It also includes Global Transaction Identifiers (GTIDs): GTIDs would eliminate the need to tell each slave the master log file and log file position. Instead, the server assigns each modifying statement a time-ordered ID so the slave just needs to know the ID of the last transaction it processed. This should simplify slave setup and snapshot synchronization further.
MySQL enterprise-level replication features are easy to configure and can help solve a wide range of performance, reliability and data security problems. Although each application's database needs are different, I hope that covering the benefits I've seen will encourage you to give it a try on a database of your own.
